Sep 2, 2010 | 11 Min Read
How to Make a Photo Slideshow: A Step-by-Step Guide
Get in touch with us
Reach out to us for any inquiries or support, and let’s connect!
Web Shop Manager – How To Make A Photo Slideshow
Creating Slideshows Easily
Creating slideshows for your eCommerce site pages or home page is incredibly simple using Web Shop Manager™ (WSM) as your content management system (eCommerce CMS). Photo slideshows can be used in a variety of ways to get the attention of site visitors and emphasize special features of the eCommerce site.
For instance, a photo slide show can be used to showcase a new product, or a popular one. A slideshow located above the fold (shown without a site visitor having to scroll down on the page) is a great way to help people quickly identify what makes your products or services unique.
In addition, contests or special promotions including a coupon code could be highlighted in a slide and then hyperlinked to a site page or eCommerce blog post for more information and details.
Furthermore, if you offer free shipping, or quantity discounts be sure to mention them in the slideshow in order to increase adoption from your customers. Slides could also be made for the seasons and simply hidden when not in use.
As an eCommerce merchant it is your job to explain to your customers as quickly and clearly as possible what makes you different from the competition and why they should chose to work with you. Photo slideshows can help creatively and graphically explain the differentiating facts and put you one step in front of the competition. While helping your customers gain insight into why they should buy from you, slideshow titles can also be SEO optimized to help get found in search engines and bring even more relevant traffic to your eCommerce website.
In order to help our clients be as successful as possible with their eCommerce endeavors WSM is committed to providing tools that are simple, easy, and effective. Time is finite and the learning process should be short and sweet. Putting you in complete control of your eCommerce website is something that we take pride in, and make a high priority. Adding slideshows to your eCommerce website can be a fun, interactive way to engage site visitors and help lead them toward conversion.
Utilizing WSM to its full extent is empowering and once you start to get a feel for how to create slideshows there will be no stopping you!
Preparing Graphics for your Photo Slideshow
The Photo Gallery Module included with WSM allows you to create photo albums that can be displayed on dedicated site pages, or embedded within content or on the homepage in the form of a slideshow.
To begin to create your slideshow highlight Modules, Click Photo Gallery from your WSM dashboard.

To add a new album, click the Add Album button.
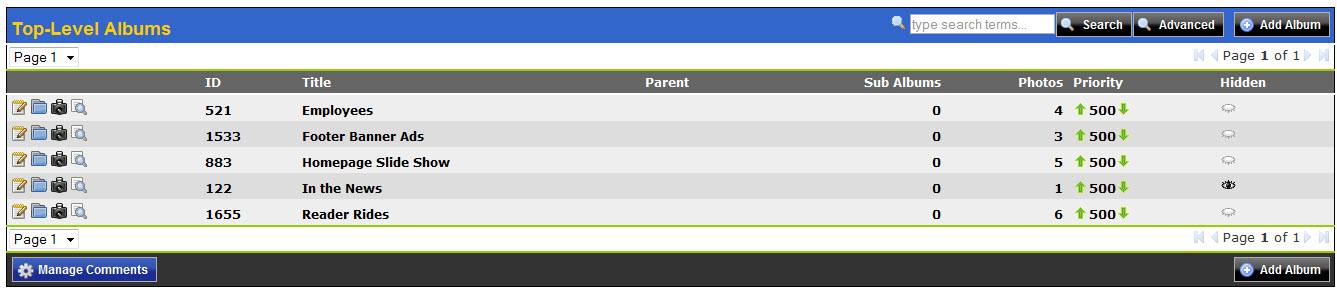
The Add Album screen is discussed in detail below. After you create your album you can return, make changes, and add photos. It is not necessary to have all of your photos ready to upload before you create your album.
Each numbered item is discussed below.
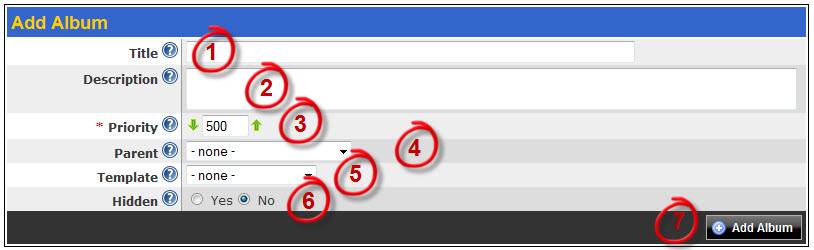
1.Title – This is the name for your album. This name should describe where your album is used and
for what purpose i.e. Home Page Slide Show. Optimize the title for search engines to help get found in SERPs (Search Engine Results Pages).
2. Description – Use the description for additional information about the album. Use this field for reference notes for coworkers.
3. Priority – Priority sets the order the album is displayed in the gallery. Higher priority albums are
placed before items with a lower priority.
4. Parent –This is similar to creating folders and sub folders on your computer. This is useful if have several slide shows such as holiday, or special promotions. If this is the case, you may want to create an album named Slide Shows and add sub albums for each individual show.
5. Template – Several site page templates may have been created for you by the WSM web design team. If so, you can specify which template is to be used with this drop down.
6. Hidden – Slide shows are special albums used in conjunction with a program on your site (which
the WSM staff will setup for you). If you do not plan to use this album for any other purpose than
Slide Shows with Web Shop Manager, you should select Yes.
7. Add Album – Once you have provided the required information click the Add Album button to
create and save your album. You can always edit the album later if you need to make changes.
Organizing Graphics in your Photo Album
There are many great photo editing tools available to you. If budget is a concern, try using free tools such as, Sumo Paint, or gimp. Sumo Paint, and gimp are intuitive and can help you to easily crop, resize, or enhance photos to include in your slide show. It is important to have slides that share the same dimensions to eliminate skewing, or distortion. The easiest way to find out what size of graphic you need is to look at an existing slide created by WSM. If you are using Mozilla Firefox, simply right click, and click on ‘view image info’. Pixel dimensions will be displayed in a dialogue screen. If you are in Internet Explorer, right click, and click on ‘properties’ to view pixel dimensions.
Custom photography would be fantastic to include in your slideshow, however if this is not an option for you, take a look at royalty free photo sites like istockphoto.com. Professional looking photos can help differentiate your site from your competitors and will help convey your message graphically. In some cases this can mean the difference in reaching your target market, or missing them completely.
Adding Photos to your Homepage Slideshow
Once you have made the appropriate changes to your photos, upload them to the slideshow album already created. Here is a brief overview of the buttons available in the Photo Gallery. They are located to the left of each album name.
![]() This icon will allow you to edit the information you entered when you first created the album.
This icon will allow you to edit the information you entered when you first created the album.
![]() This icon will display sub-albums, if any, that are assigned to this album.
This icon will display sub-albums, if any, that are assigned to this album.
![]() Use this icon to access the photos you have already uploaded to the album and to add photos.
Use this icon to access the photos you have already uploaded to the album and to add photos.
![]() This icon will display the album as a web page. You will not display the album to your viewers in this format.
This icon will display the album as a web page. You will not display the album to your viewers in this format.
You can add photos two different ways, individually or multiple files at the same time. Both are available from the same Add Photo screen.
To add photos, as mentioned above, click the ![]() icon.
icon.
Adding the Slideshow to your Homepage
In addition to preparing your photos, and then your photo albums for the slideshow there is one more item that needs to be in place for the photo slideshow to be completely functional. This component is called a Widget. The Widget will include parameters that control how the slide show is displayed to your customers.
After reviewing this section if you need assistance with setting up the widget, please contact the WSM support staff.
First, what is a Widget?
Widgets are small programs that make an application or service perform in a specific way. They allow users to access applications without in-depth knowledge of what is happening behind the scenes. You will need to place a small piece of widget Code for your album to function as a slide show. The slide show can function with a few basic settings. The only code you need to change is the ID and the height of your images, see example below. The ID identifies which photo album you want to use for this slide show. You also need the parameter for slideshow. The parameter is what tells the widget to display the album as a slide show.
To determine the ID for the photo album from within your eCommerce dashboard, highlight Modules and click Photo Gallery. Look in the ID column for the album you created and note the ID number.
To add the widget code to your Site Page, highlight the code below, press Ctrl C to copy, while editing the predetermined Site Page, place your cursor where you would like the slideshow to appear on the front end, then press Ctrl V to paste. Delete the 123 ID and type the ID number for the photo album you have created for the slideshow.
Additional Modifications to your Website Slideshow
You can add additional parameters to your code to change the way your slide show functions and appears. Each setting is described below.
Required Parameters:
gallery: determines that the gallery module is to be used for this widget.
Required value: gallery=’true’
instance: recommended to use only if there are one or more instances of the widget that need to be styled differently. It adds a unique div id value to the <ul> tag
Values: numeric or alpha
Example: instance=’_myslideshow’
limit: must set a limit on the number of images that get loaded to the slideshow. Max recommended is 5
Values: numeric
Default: unlimited
Example: limit=5
Control the animation and pagination of the slideshow:
cycle_fx: this controls the transition animation between slides. Most of the effects listed here will work: http://malsup.com/jquery/cycle/browser.html for list of effects
Default: fade
Example: fx=’slideX’
cycle_timeout: Time between the fades in milliseconds
values: milliseconds
Default Value: 3000 – which equates to 3 seconds
Example timeout = ‘2000’
cycle_speed: Fadingspeed
Values: in milliseconds
Default Value: 1000
Example: speed = 2500 – which equates to 2.5 seconds
height: Height of the containing element
Values: Any css-height-value such as px, em, % – recommend doing px value
Default Value:120px – which equals the default thumbnail height
Example: height = ‘315px’
Pagination Controls:
cycle_pager: determines to show pagination controls
Default: true
Example: cycle_pager=’false’ – will remove pagination controls
show_prev – used to hide previous button
Default Value: True
Example show_prev=’false’
show_next – used to hide previous button
Default Value: True
Example: show_next=’false’
cycle_controls_top: move pagination controls to the top. Controls are defaulted to show under the slideshow of images.
Default Value: false
Example: cycle_controls_top=’true’
cycle_pager_thumb: pagination links can be the thumbnails of the images
Default Value: false
Example: cycle_pager_thumb=’true’
Related parameter:
img_thumb – size of the thumbnail.
Values: T=thumbnail, M=medium, F=fulsize
Default=T
Example: img_thumb=’M’
cycle_pager_name: pagination links can be the Name of the image
Default Value: false
Example: cycle_pager_name=’true’
cycle_skin_overlay: pagination controls are overlayed on top of theslideshow. Only the Prev and Next links are present.
Default: false
Example: cycle_skin_overlay=’true’
Control Link of the images:
The default setting is to use the URL places in the URL field when creating the album image. But you have other options as needed.
link_image: link to the photo view in the album
Default: false
Example: link_image=’true’
lytebox: open up the image in a lytebox popup
Default: false
Example: lytebox=’true’
Other Parameters:
show_info: show the description of the image
Default: false
Example: show_info=’true’
Increase Conversions with Photo Slideshows
Photo Slideshows have been used by eCommerce industry leaders to effectively promote products, and increase sales. Create your own professional looking website slideshow in a matter of minutes with WSM!
If you are looking for a Content Management System & eCommerce Web Design Company to take your business concept and help transform it into a selling machine, contact Web Shop Manager today. We take care of the details so you can concentrate on your e-business.
Have you seen WSM in action yet? Take a moment to sign up for your own LIVE demonstration.

More On Related Topic
Explore our highlighted blogs for the latest insights and trends in the industry.
Boost Sales with Live Chat for Ecommerce: The Ultimate Guide
Web Shop Manager - Live Chat For eCommerceWSM just launched our new Live Chat for eCommerce module which is available to all users in the Dealer package. Tests have shown conversion rates increasing from 2% to 20%...
How to Get Customers That Are Ready to Buy Now (Actionable Tips)
Ecommerce: 3 Ways to Attract Customers That Are Ready to PurchaseThere are a lot of people who come to your online store and don't buy. And while you might see an abandoned e-commerce cart or a...
How to Add Personality to Your Website Designs for Better Engagement
Web Shop Manager - Personal Website DesignsBeing a web designer isn't just about creating a functional website that serves its purpose, obviously that’s a major part of it, but it isn't the end of...
Ready To Grow Your Business?
Ready to elevate your aftermarket eCommerce presence and conversions—across auto, truck, powersports, marine, and more? Connect with
Web Shop Manager for tailored solutions: strategy, platform, and performance in one team.