How to build a high performance Ecommerce category tree
Are you confident your Ecommerce store’s category tree is driving as many sales as it should be? Could it be losing you sales?
After years of working with thousands of Ecommerce stores, we’ve found that many store owners have trouble creating effective category trees, despite the fact that a well structured category tree is fundamental to driving sales.
We’ve created this master guide on how to correctly organise product data and online navigation (no matter what size your inventory), to improve the performance of your store.
The guide is broken into five phases:
Strategic Planning (Factors to know before building)
Data Preparation (Keyword research and mapping)
The Technical Hierarchy Build (The actual structural logic)
Launch & Maintenance (URLs, breadcrumbs, and going live)
Future-Proofing & AI Search (PartsLogic, automation, and attribute-based navigation)
Fast Track
Already know the basics?
Skip the introduction and head straight to the implementation.
Following this series and putting it into action will help your customers easily find what they are looking for, and make quick, accurate (and more frequent) purchase decisions.
Make your products easy to find, compare and choose to increase Ecommerce sales.
Why does your store need a good category tree?
Your category tree and navigation is the tool you present to your customers to help them find and purchase products from your store.
If you create a confusing, inaccurate or insufficient category tree, your customers will feel lost or frustrated, and simply bounce to your competitor to find what they want, and buy from them instead.
Using our guide, you will be able to create an intuitive product navigation system that guides customers to the product category they are looking for, allow them to browse and compare your range, and make a purchase decision with the least amount of friction.
A good category tree is also excellent for SEO (leading to more traffic), but we will cover that in a different post.
For now, just be sure that following this procedure will help improve user experience, leading to more add to carts and completed checkouts.
Phase 1: Strategic Planning (Factors to know before building).
There are four important factors to consider before building your tree.
1Factor 1: Get clear on your success criteria
Before you begin with the actual data, you need to know what it means for you to be successful. This ensures you take the right steps that will actually get you to those goals.
“A goal properly set is halfway reached.” – Zig Ziglar
We recommend getting the whiteboard out at this stage, and really getting clear on your end goals.
Most likely, this will simply be to make more sales, but you may find that you have particular ranges that you want to sell more of, or you may be going through a product launch or seasonal promotion and want to prioritize those on top of simply making more sales across the store.
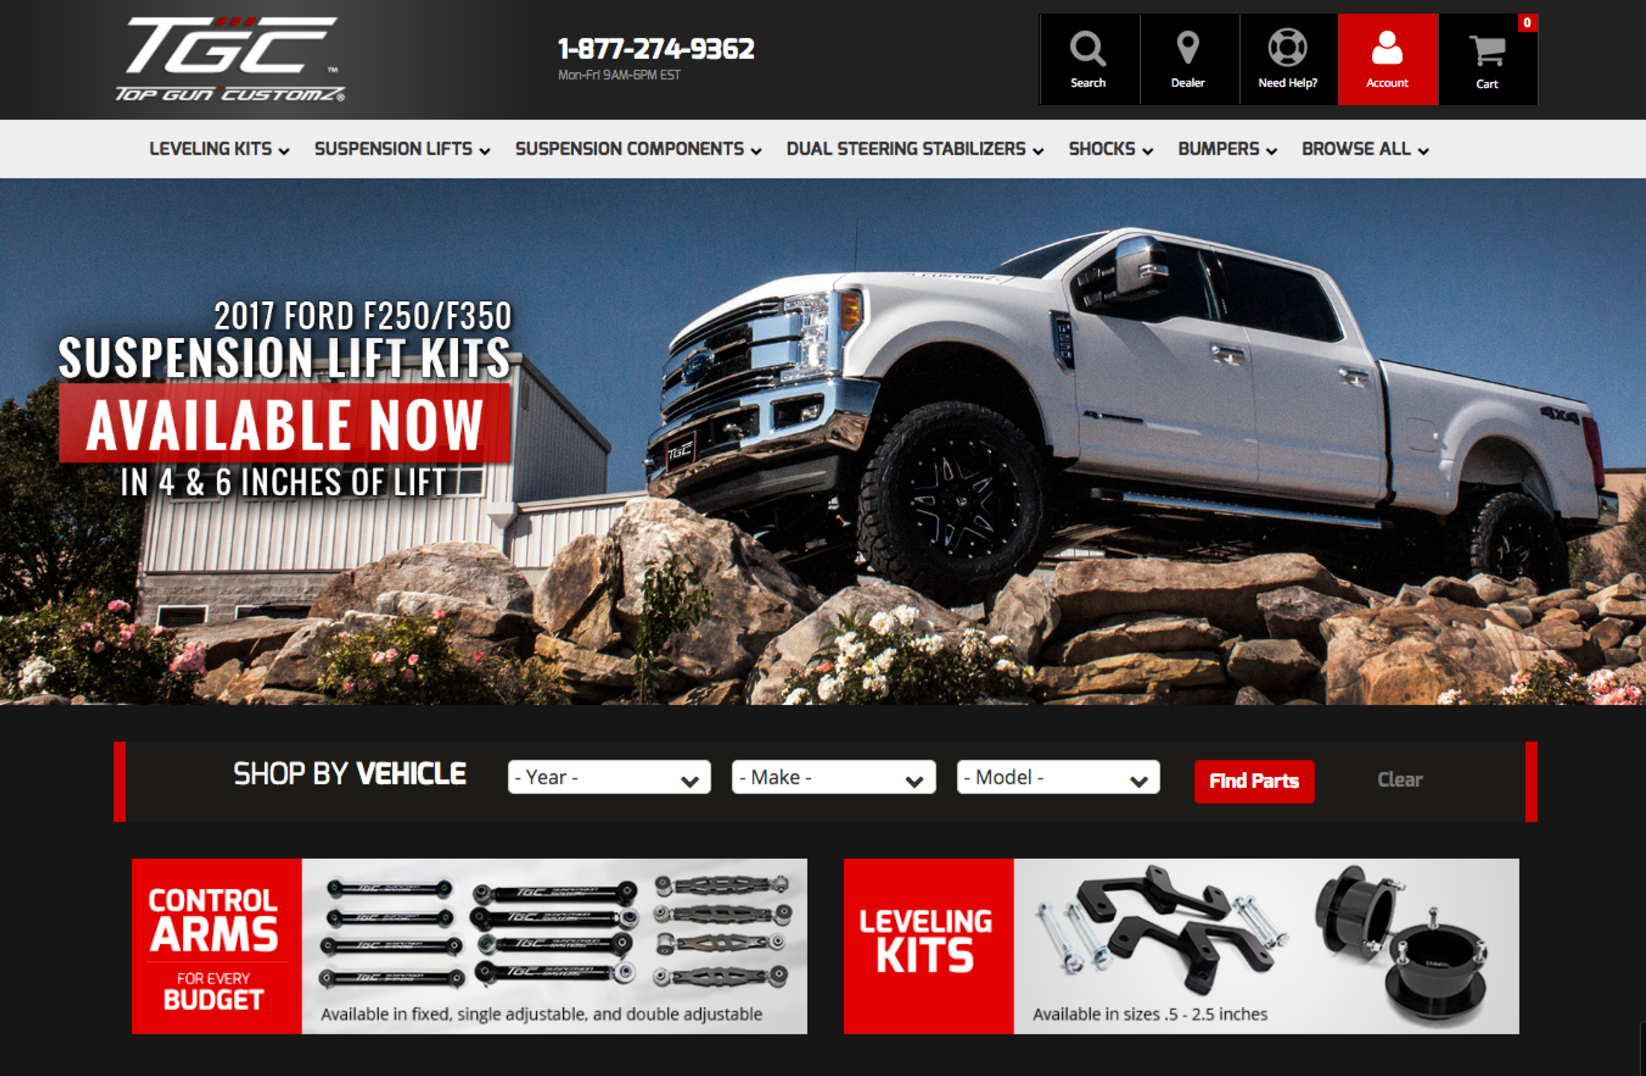
2Factor 2: Identify your key products
These should be your money makers, your most popular items and the products with the highest profit margins.
Especially if you are a manufacturer or it’s your own brand. It could be the cornerstone product for your purchase – for example if you are selling Jeep accessories, the ‘Lift Kit’ is likely a cornerstone product.
A client site we built recently that prioritizes lift kits, control arms and leveling kits as key products.
Your cornerstone products should be available within three clicks. Customers are most commonly looking for them, so presenting them upfront will lead to more conversions, while leading customers deeper to purchase more.
Keep a note of these, and prioritize them when you build your tree.
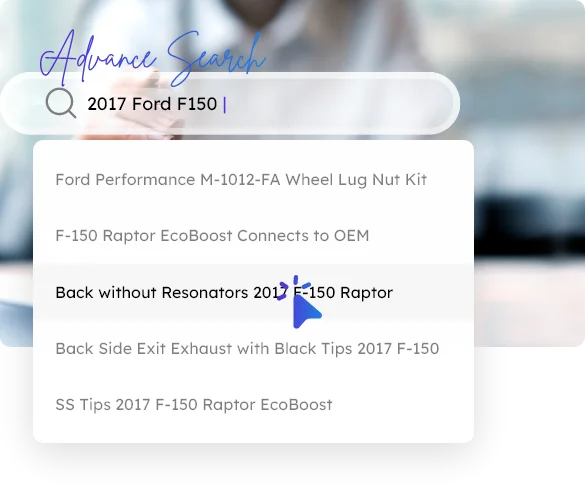
3Factor 3: Stick to ‘Three Clicks To Buy’
You don’t want to force customers to ‘stumble over’ your smaller products and complete category listings to find the products they want.
There are a lot of short term memory studies out there showing that we can hold between five and nine items in our minds, but anything over that and we tend to become overwhelmed.
To avoid decision fatigue, ideally you want your items to be easily located within ‘three clicks’ from where they begin. This isn’t an option for all items, particularly if you have a larger inventory, but should apply to your key products.
4Factor 4: Would this make a good landing page?
When building your category pages, consider how this page would perform if you were to use it as a landing page for PPC, SEO or email list traffic.
Would you send traffic to this page? If you did, how would it perform? If you think it would perform poorly, you need to reconsider the content of the page.
Do you have too many types of product here? Do you not have enough? Should you add a little copy at the top to set expectations? Could you add breadcrumbs or related categories for customers to navigate to if this page isn’t right?
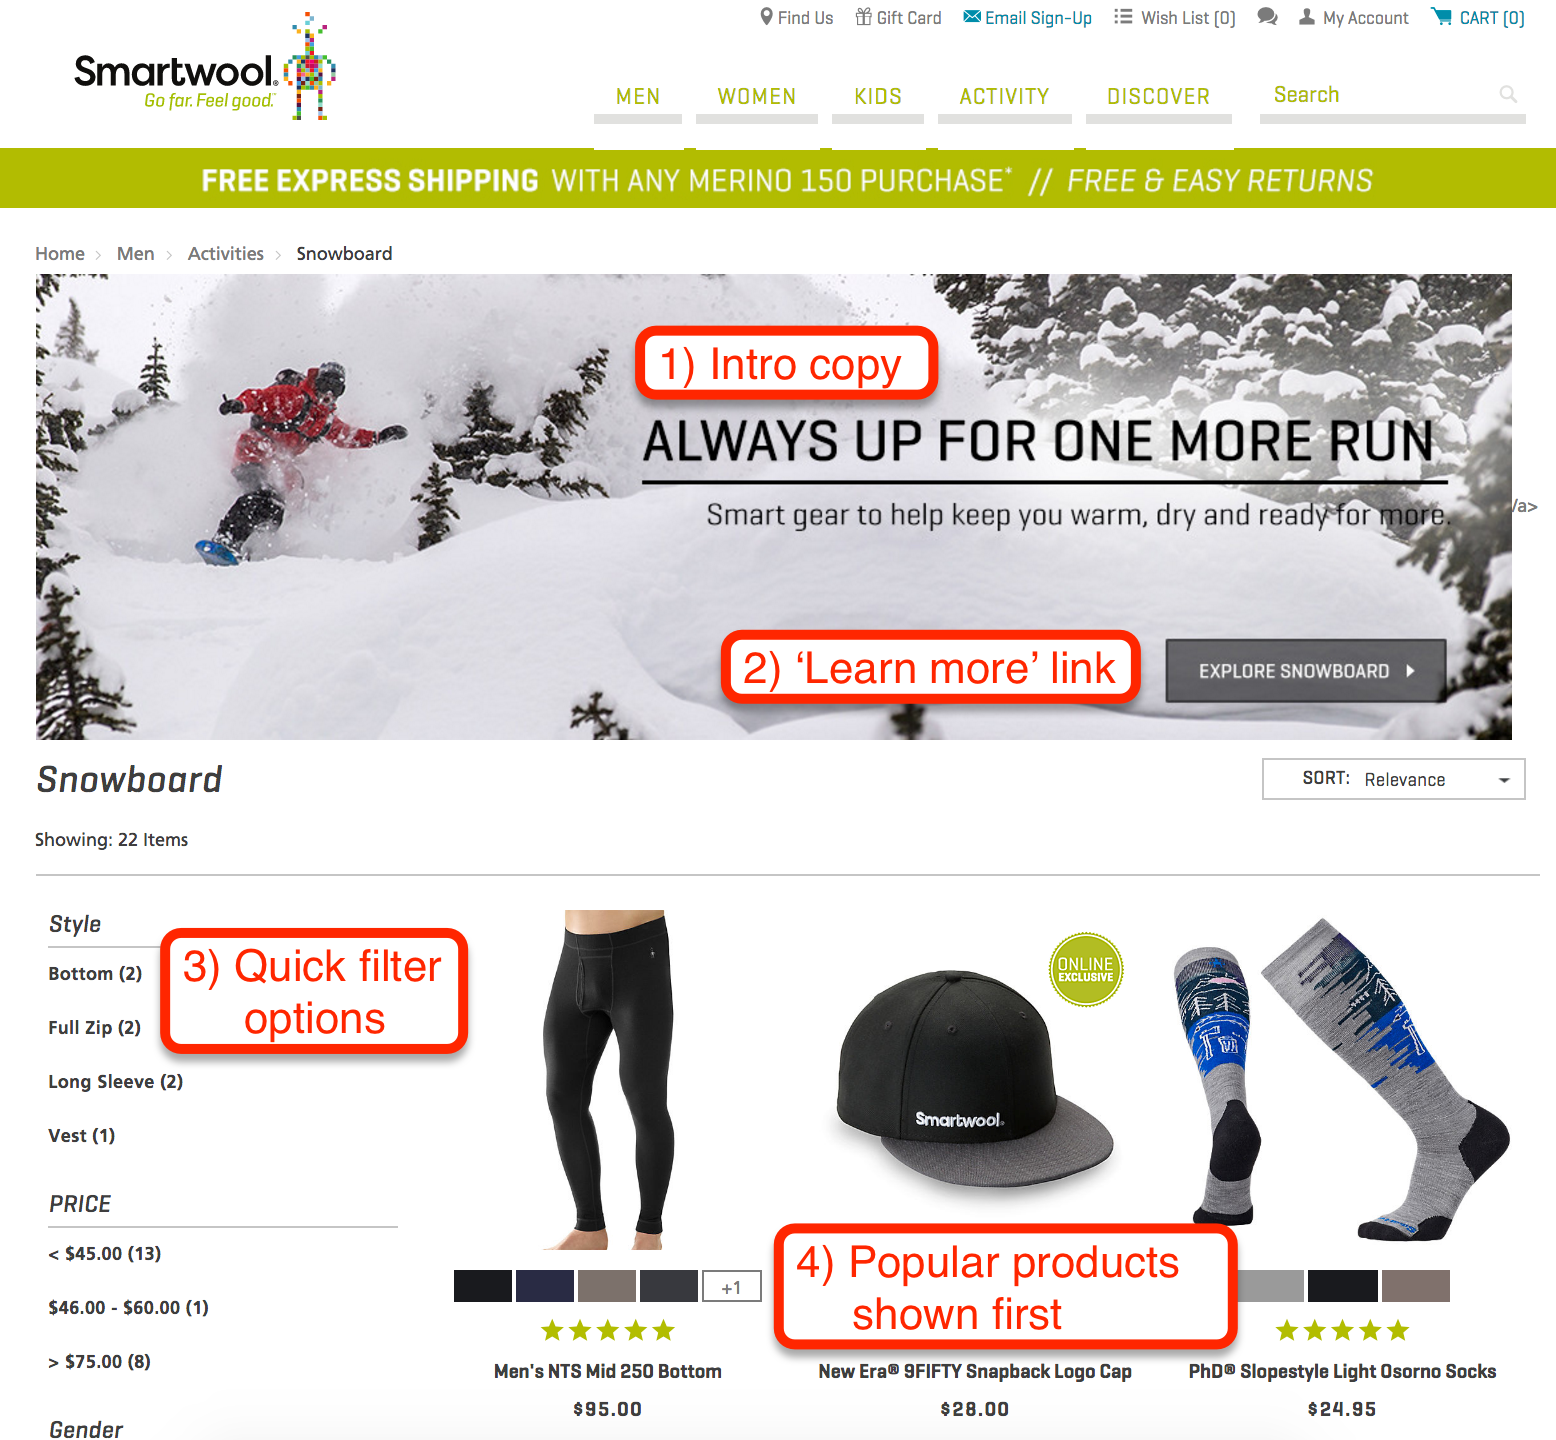
Here’s an example of a category page that works well as a landing page:
Smartwool are using good copy to catch interest, a link to learn more, quick and easy filtering options and popular products sorted by relevance.
New customers are very likely to stick around and check out their products, which is the primary goal of a landing page.
Now that you are aware of these four factors, you’re ready to start prepping your data!
If you find yourself overwhelmed by the complexity of mapping high-SKU counts or complex automotive fitment, our [Data Services] team can handle the heavy lifting of taxonomy development for you.
Phase 2: Data Preparation (Keyword research and mapping)
Now that we’ve covered some guiding principles in let’s get your data organized for building your tree. This will be more of a challenge for larger inventories, but also of greater importance.
The more products you have in store, the more essential it becomes to get that data well organized, and allow your customers to navigate to their desired products as quickly and effortlessly as possible.
1Mapping Your Product Data to Categories
First, we need to map your part numbers to product categories to get a high-level overview of your store’s architecture.
The Challenge: Standard Data vs. Customer Needs
One of the biggest hurdles is when different products share the same generic manufacturer part type. Standard data often fails to provide the granularity required for a high-converting store.
Tonneau Covers:
Usually grouped as one type, but should be split into Hard Folding and Soft Rolling.
Bumpers:
Manufacturer data groups these together, but your navigation must separate Front and Rear bumpers.
To solve this, you may need to create an In-House SKU column. This allows you to split identical manufacturer part numbers into unique entries that map to specific categories like “Front Bumpers” vs. “Rear Bumpers.”
Spreadsheet Requirement
Part Number
In-House SKU
Primary Cat
88301
88301-FRONT
Front Bumpers
88301
88301-REAR
Rear Bumpers
55402
55402-SOFT
Soft Rolling
Add your In-House SKU between the Part Number and Primary Category columns.
42%
REVENUE CONTRIBUTION
Data Insight: Accurate SKU mapping captured the 6% of high-intent users who generated 42% of Pace Performance’s total revenue.
A major advantage of eCommerce is the ability to place products on multiple “digital shelves,” making them significantly easier for customers to find.
Maximizing Visibility Across Categories
While mapping, you’ll find products that serve multiple roles. In the automotive niche, a single LED bar might belong in General Lighting, but it is equally essential in Recovery and Towing categories.
The “Brick & Mortar” Customer Experience
In a physical store, if redwood lumber is hidden in the Garden/Fencing section instead of the Lumber aisle, a customer might wander for 20 minutes. Online, that customer won’t wander—they will bounce to a competitor with one click. Placing items in multiple categories ensures that regardless of why they are searching, they find the product quickly.
Don’t limit your SEO reach. By categorizing products across multiple relevant landing pages, you capture broader search intent and reduce friction in the buying journey.
Data Mapping Schema
SCALABLE
Product
Sec. 1
Sec. 2
LED Light Bar
Recovery
Towing
Redwood Plank
Fencing
Lumber
Work Light
Portable
Emergency
Action: Create extra columns (Sec. Category 1, 2, etc.) to allow items to appear on multiple “digital shelves.”
3Recommended & Related Products
Strategically mapping cross-sells and upsells at the data level prevents customer bounce and maximizes Average Cart Value.
Maximizing Average Order Value (AOV)
At this stage, identify which products and subcategories should be recommended to customers browsing specific areas of your site. This keeps customers moving through your funnel rather than bouncing to a competitor to find accessories.
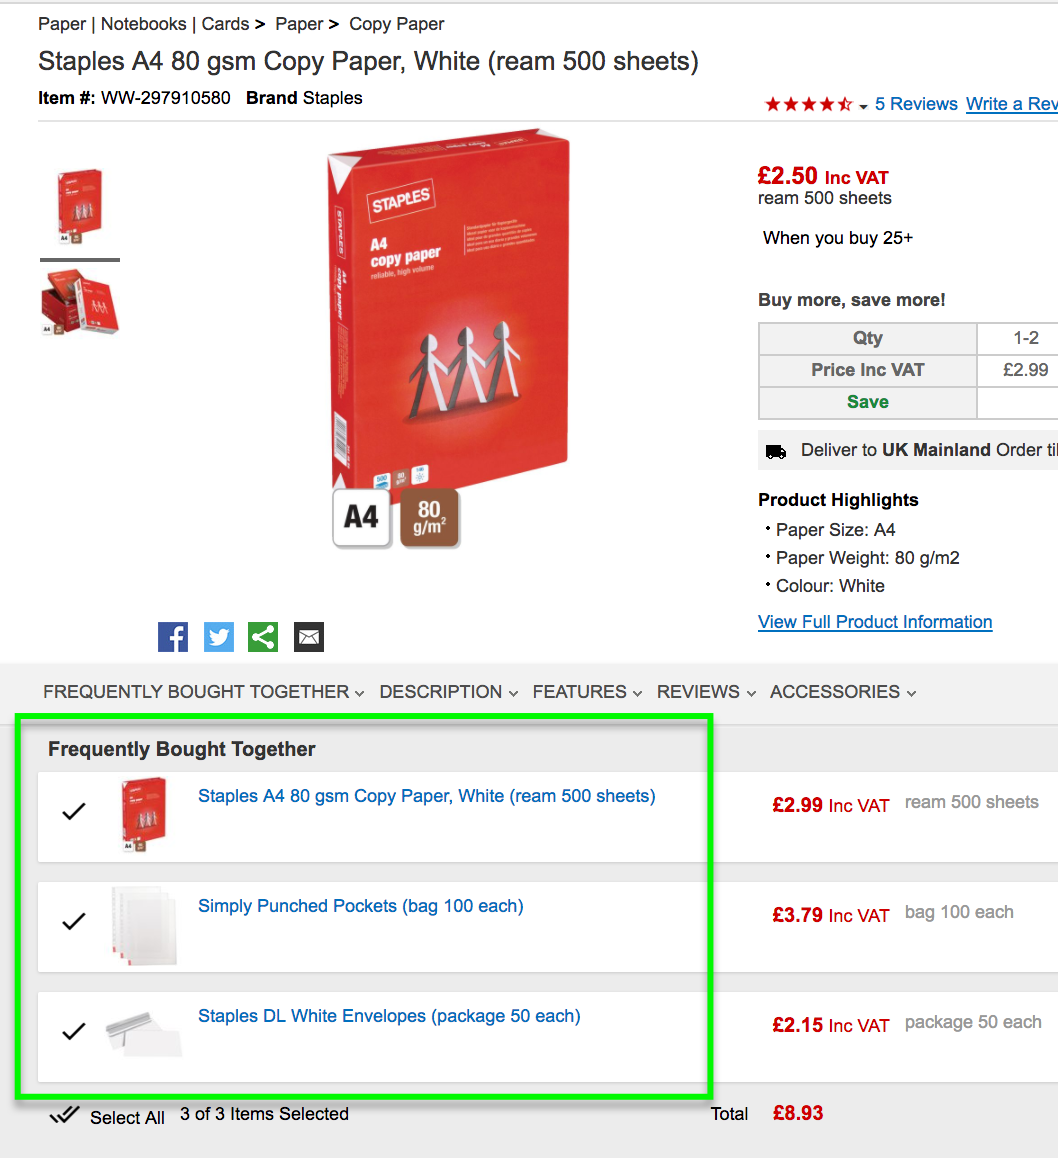
The “Staples” Strategy
UK Ecommerce giant Staples excels at this by recommending products in the same line (more paper) alongside complementary items like envelopes and folders.
Note: Encouraging customers to discover items they hadn’t considered increases conversion rates and customer lifetime value.
Revenue Blueprint
Primary SKU
Cross-Sell
Lumber Plank
Wood ScrewsJoist Hanger
LED Bar
Wire HarnessMounting BracketsAnti-Theft Bolt
Data Task: Create new columns in your spreadsheet labeled ‘Cross Sell 1’ and ‘Cross Sell 2’ to map these relationships.
4Strategic Product Groupings
The depth of your category tree depends entirely on the size and specialization of your inventory.
Defining Your Navigation Logic
Finally, you must decide how to group your items. These groupings aren’t just for organization—they act as Strategic Landing Pages designed to capture high-intent traffic from SEO and PPC campaigns.
The Strategy Exercise
Whether you use a whiteboard or a shared document, ensure your hierarchy makes sense before the technical build. If you sell “everything automotive,” you need broad parent groups. If you are a niche specialist, you can bypass the fluff and dive straight into specific product attributes.
You’re ready to build your category tree!
With your data mapped and groupings defined, it’s time to put your preparation into action and build a high-performing architecture that drives revenue.
Grouping Logic
Large Inventory Path
AccessoriesBumpersFront/Rear
Specialist Store Path
Front BumpersBrandModel
Final Check: Does your tree feed the search engine, or just clutter the menu? Aim for a structure that supports Faceted Search.
Fast Track
Planning your growth?
Get the exact roadmap used by top-performing brands to secure record-setting sales.
Phase 3: The Technical Hierarchy Build (The actual structural logic)
Now that we have our information prepared to get the best results, let’s start building your category tree.
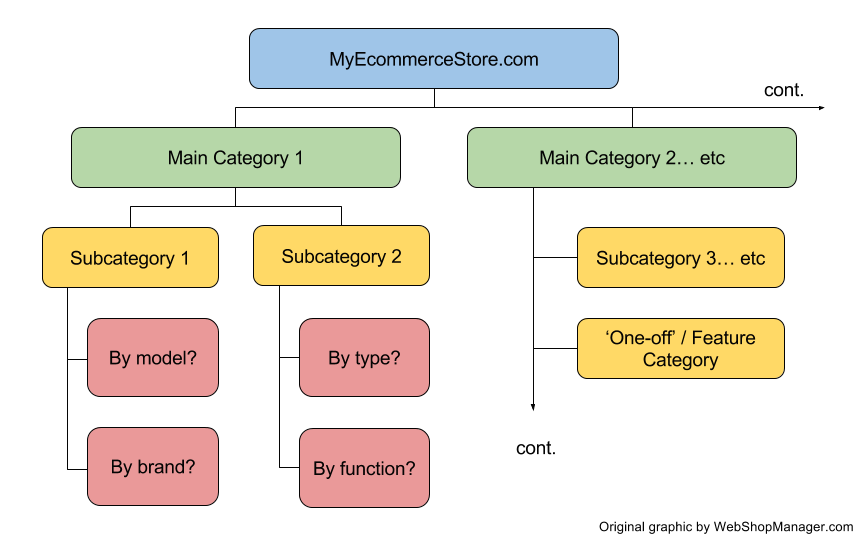
Think of the following sections hierarchically.
Your main categories will be at the top of the tree, and they will be fewest. Under that will come your subcategories, levels 1, 2 and perhaps 3, and will number higher than your main categories. Finally, you will have set of filters that narrow down the search to the very most specific details of the product.
When it’s done, it will look like a Christmas tree, thinnest at the top, and widest at the base, like this
An example of how your Ecommerce category tree should start to look. Less main categories, more sub- and sub-sub-categories.
1Main Categories
These are your broadest groupings, designed to immediately communicate the total scope of your inventory to new visitors.
Defining the Scope of Your Store
Your main categories serve a dual purpose: they intuitively lead customers toward a purchase while simultaneously outlining what you do and do not stock.
The “Visibility Gap” Scenario
The Success: A customer wants a Rear Bumper. They see “Bumpers” in your main menu, click, and buy.
The Bounce: A customer wants Electronic Components. You stock them, but “Electronics” isn’t a main category. They bounce to a competitor thinking you only stock cosmetic accessories.
REI provides an industry-leading example of this by breaking down “Outdoor Gear” into clear, distinct boundaries that manage customer expectations instantly.
Scope Strategy
PILLAR
01.Instant Clarity: Visitors understand your full product range in seconds.
02.SEO Authority: Main categories act as your most powerful ranking pillars.
03.Logic Path: Intuitively leads customers down the right purchase funnel.
UX Goal: Ensure every major product group has a “Main Category” allocation at the top of the tree.
REI’s clear breakdown sets the boundary of what they stock.
2Subcategories
Break down your main categories into specific groupings where customers can easily compare and select their desired products.
Refining the Customer Path
The goal of a subcategory is to draw customers to the right product grouping without overwhelming them. We recommend sticking to 1-2 levels of subcategories to stay within the “3 clicks to buy” framework.
The Navigation Boundary
The subcategory level is usually too early for variables like size or material. Listing every variation in the main menu creates “Analysis Paralysis.” Instead, get them to the group (e.g., Front Bumpers), then let filters handle the options.
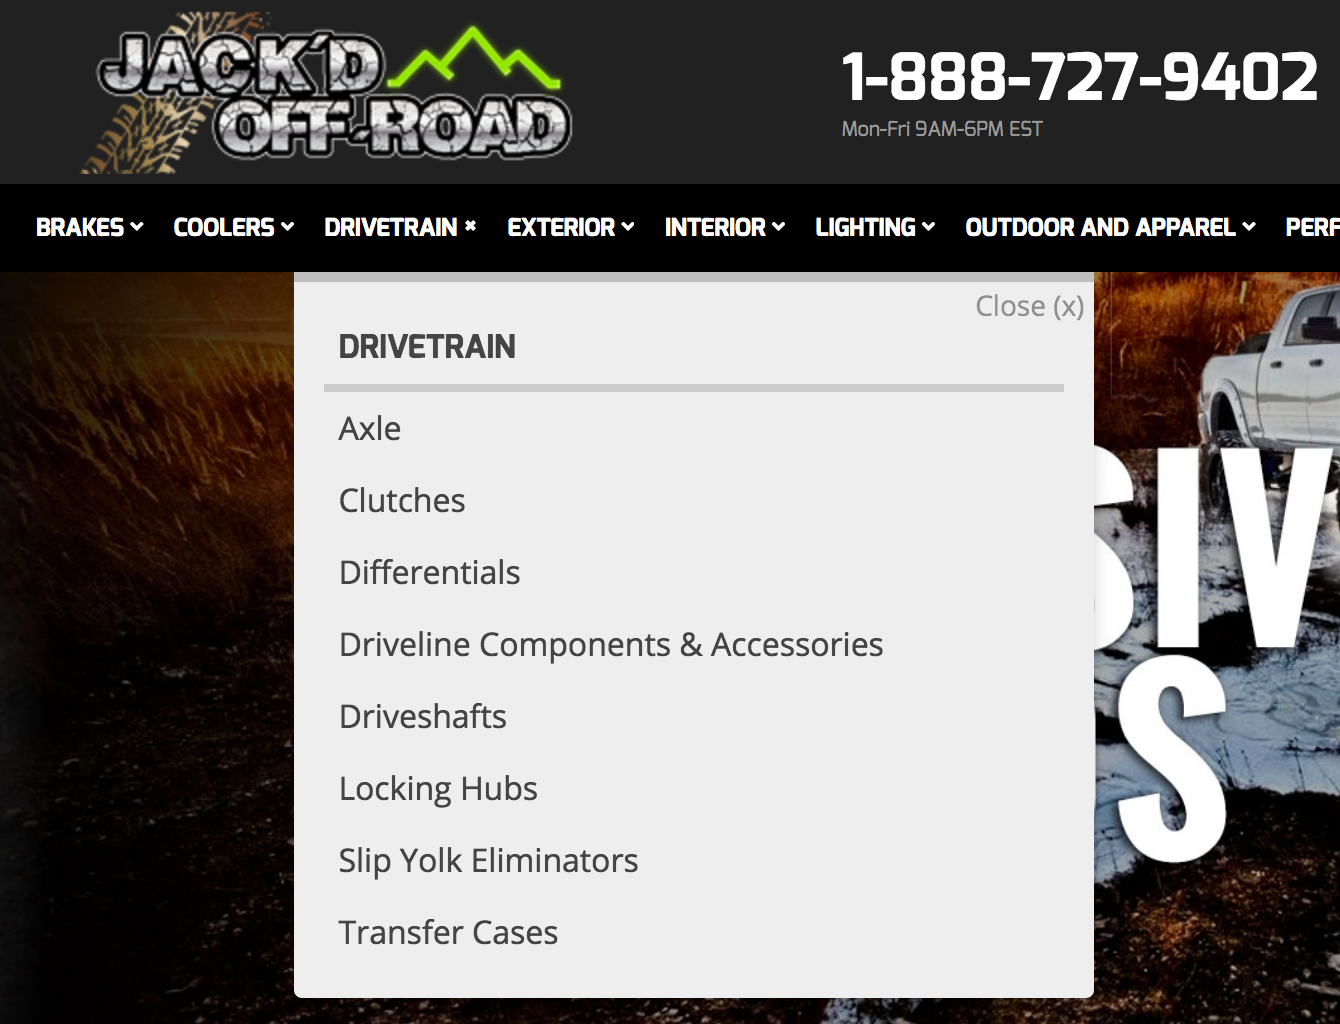
Web Shop Manager client Jack’d Offroad demonstrates this perfectly by breaking down their “Drivetrain” pillar into clear, manageable subcategories.
Branching Logic
HIERARCHY
Example: Automotive
BumpersFront Bumpers
Example: Apparel
JeansSkinny Fit
UX Framework: Strive for the “3 Clicks to Buy” rule. Deep category trees increase abandonment rates.
Clear subcategories make products easier to find, compare, and purchase.
3‘Feature’ Categories
These unique groupings fall outside your standard attribute-based navigation, highlighting seasonal items, trends, or specific product statuses.
Creating Familiarity & Urgency
Feature categories like Sale Items, Best Sellers, or New Arrivals are powerful tools for conversion. Placing these in permanent, visible spots like the top header “trains” regular customers to check back routinely for deals.
Strategic Selection
Don’t use every feature category at once; you risk confusing your audience and devaluing your brand. Choose a few (e.g., Limited Editions or Specials) that align with your specific business goals and customer shopping habits.
This strategy is highly effective for seasonal lines like Christmas or Halloween. High-conversion stores like Pottery Barn even place featured categories directly within their drop-down menus to manage large inventories effectively.
Marketing Logic
CONVERSION
Primary Examples
Best SellersNew In StockDiscount ItemsLimited Edition
Herb.com permanently displays specials in the top bar to train recurring customer behavior.
Placement Tip: Use the Top Header for permanent links (familiarity) and Home Banners for seasonal links (urgency).
Strategic placement of featured categories creates habitual browsing behavior.
4Filters & Tagging
Filters allow customers to dig into specific product attributes without cluttering your main navigation menu.
Refining the Selection Process
Once a customer reaches a specific subcategory—like Rear Bumpers—they still have questions. Filters help answer these by allowing users to refine results based on budget, color, or fitment.
The Zappos Model
Retail giant Zappos uses checkbox filters to manage massive inventories. By selecting just two attributes (e.g., Small and Burgundy), a customer can narrow 444 items down to 4 manageable options. This makes comparison and purchase decisions nearly instantaneous.
Crucially, if a user narrows their search too far, they can easily adjust a slider or uncheck a box. If these options were hard-coded as subcategories, the customer would be forced to hit the “back” button, often ending their journey entirely.
UX Strategy: Use filters to handle product variables. Use subcategories to handle product types.
Faceted navigation makes it easy to narrow down thousands of items in seconds.
Phase 4: Launch & Maintenance (URLs, breadcrumbs, and going live)
Fine-tuning the system: getting the most out of your category tree
1Fine tuning the system: common issues to look out for
Now that you have your basic outline for your category tree set up, let’s look at a few potential problem areas, to make sure you get maximum performance from your navigation right off the bat.
2Understand your platform’s limitations
Not all platforms are created equal, so find out where your platform under-performs and what options you have to improve. You may be able to code the changes yourself, or you may wish to switch platforms. The considerations may vary slightly from niche to niche, but I will give you some examples from the automotive industry. Ideally, a platform for an online retailer selling automotive accessories should have:
1. A system with a ‘Year / Make / Model’ lookup All Web Shop Manager client websites are fitted with ‘Year / Make / Model’ lookup to easily find the right parts for your exact car. This allows people to search through the categories and find products relevant to their specific car. This is very effective for all large inventory stores. If this aspect is sticky, all the better, as people can access it from anywhere on site. If there is no ‘Year / Make / Model’ lookup feature, you can either implement your own (which may be expensive) or use your vehicle names and specs as categories themselves.
Sidebar attributes / facet navigation Web Shop Manager client site DriverMods.com using sidebar attributes to filter large inventory Describe the details of the product (such as color, size and materials) and allow products to be filtered using these criteria. You wouldn’t want to create a category for every color (for example, ‘tan car mats’) as it is not a category people are likely to be looking for and it would clog up your navigation. Allowing faceted filtering in your sidebar will allow people to check other products with similar attributes while they browse. If you don’t have this feature, you can either create a category for each attribute (increasing the size of your navigation greatly, potentially overwhelming customers) or just accept that your items aren’t browsable by those criteria.
3. Product groups (aka. Product series) Also known as ‘collections’, this feature allows you to group certain products whenever you like. This could be for a flash sale, to highlight a range you want to promote or for seasonal products. Examples may include a Spring Collection, Black Friday ‘Crazy Deals’ or a product specific sale, such as ‘Bumpers Spring Sale Promotion’. Rather than send traffic to a category that may have several thousand SKUs (eg. ‘Weathertech Floor Mats’) you can display a smaller selection from within the category, such as the ‘BAKFlip G2’, which would bring up perhaps 4-5 products. From that narrowed down selection it’s much easier to compare features and benefits before you put your vehicle fitment in, and ultimately make a purchase decision.sears-fitness-real-deals.pngSears grouping together all their fitness items that are on sale. A much smaller selection that showing ‘all fitness items’ or ‘all sale items’ together.
3‘Too broad vs. Too specific’
I like to give a ‘three bears’ analogy when it comes to getting the scope of your category tree just right. It’s important not to overwhelm people with information. It may seem logical to present all options to your customers at once, so they can most quickly find what they need, but it will actually confuse them. Too hot! If you are too specific and list too many small categories right off the bat, you will be ‘too hot’, and customers are likely to turn away due to overwhelm. Resolve this by removing some categories from the navigation and allowing them to be filtered as attributes on the product and category pages. Too cold! If you don’t provide enough overview of your product range in your category tree, you will be too cold. Customers won’t be able to get an overview of what you’re selling, and may not even know that you sell what they want. Resolve this by ensuring all of the major product groupings on offer in your store are listed in the ‘top level’ of your category tree, known as your ‘main categories’. Just right….You have it just right when you provide a good overview of your product range, which is easy to browse quickly, isolate the category area you want and get down into the subcategories and product pages to start making purchase decisions. This is why we advocate a ‘three clicks to purchase’ methodology, and in general advise keeping subcategories to 2-3 levels deep at most. This will vary from store to store, so you will have to use your industry and customer knowledge to get your best results.
4Dealing with large inventories
If you are dealing with large volumes of inventory and SKUs then your task of categorizing and filtering is especially big, and especially important. You will need to utilize cross-selling and related categories more than in smaller stores, and your filtering system will need to be especially dialled in.
5Maintaining your tree over time
We now have your tree built, and that’s awesome – you are already huge strides ahead of where you were before, and the conversions and sales should begin rolling in. But the work isn’t done yet. You need to test, refine and improve your category tree over time. You will do this with A/B testing and heat mapping, which we will be teaching you about in an upcoming blog. This helps you find out where people are clicking, how they are browsing your site so you can determine clearly what is working and what is not. Once you know this, you can make changes and iterate to keep the parts that get results and change the parts that don’t, until you are fully optimized. Look out for a blog post coming up on that.
6Over to you!
There’s only so far we can lead you on this journey, and now the time has come for you to take action and put together your high performance category tree. Your customers and bottom line will thank you for it when you do!
Fast Track
Stop guessing and start accelerating
Download the definitive roadmap to dominate the parts market.
While your tree is now live and functional, the industry is moving toward a model where data does the heavy lifting for you—jump into Phase 5 to see how AI-driven search and dynamic filtering are turning these static trees into high-speed conversion engines.
Phase 5: Future-Proofing & AI Search (PartsLogic, automation, and attribute-based navigation)
The Category Tree of Tomorrow is Dynamic
Future-proofing your store means building a tree that feeds the search engine, rather than just cluttering the menu. The category tree of tomorrow is dynamic, not static. The goal of a modern category tree isn’t just to organize files; it’s to provide the structured data that allows AI search engines like PartsLogic to understand customer intent instantly.
Traditional “Hard-Coded” Trees
✕ 7-click-deep sub-categories
✕ Hard to manage “folders”
✕ Frustrating user digging
✕ Rigid structure
PartsLogic Dynamic Facets
✓ Flatter, faster menu structures
✓ Dynamic YMM attribute filtering
✓ Instant intent-based results with less clicks to buy
✓ Automatic Data Updates from all of the various sources
✓ Eliminates ‘Zero Results Found’ by mapping complex fitment data directly to search intent
By transitioning toward attribute-based navigation and faceted filtering, you allow customers to bypass 7-click-deep trees and find exactly what they need in seconds. Future-proofing your store means building a tree that feeds the search engine, rather than just cluttering the menu.
This isn’t just theory—East Coast Gear Supply used this exact dynamic approach to drive a $245,000+ annual revenue boost.
Success Spotlight
How PartsLogic Search Solved the “Data Gap”
East Coast Gear Supply (ECGS) was struggling with a complex parts catalog where users couldn’t find exactly what they needed through traditional menus alone.
If you’re interested to learn more, check out my video on YouTube where I go into these topics and more. You may view the presentations I was invited to give at the SEMA car show in Las Vegas through my automotive strategic vault a collection of industry-proven success and branding guides. We hope you enjoyed this series! Is your category tree up and running yet? If you need help, let us know in the comments below!
Don’t just build a better category tree.
Build on a platform that automates the work for you. WebShopManager is the only eCommerce solution designed natively to handle complex automotive fitment, high-SKU catalogs, and AI-driven search right out of the box.
Dana Nevins is the CEO of Web Shop Manager, bringing over 25 years of dedicated experience in the automotive aftermarket and digital retail sector. As a recognized leader, he specializes in simplifying complex enterprise challenges, including ACES/PIES compliance and scalable B2B/B2C solutions, helping retailers turn high-volume data into competitive advantage.
Explore our highlighted blogs for the latest insights and trends in the industry.
Blogs
Customer Acquisition Plan
When you have a fully developed customer acquisition plan, you may want to let it simmer so that you can gather data to improve it. However, that can be tough when you’re continually on...
Benefits of a CMS for Big Data Ecommerce: Boost Your Online Store
Benefits of a CMS for Big Data & eCommerce| Web Shop ManagerA Content Management System (CMS) like Web Shop Manager makes it easy to build and maintain a high quality website without having limited...
The Changing Marketing Landscape in eCommerceIt should come as no surprise that the web has completely changed the way that marketing works. Old strategies no longer apply in a world that is interconnected. In...
Answer: Aim for 3 clicks or fewer; generally a root category followed by 1-2 subcategory levels, using filters for the rest.
Categories are permanent folders (e.g., Exhaust Systems), while attributes are variable characteristics (e.g., Material, Diameter) used for filtering.
Usually no; it’s better to use a “Shop by Brand” filter or separate navigation to keep the main tree focused on product types for better SEO crawling.
No. Fitment should be handled via a YMM lookup tool or faceted attributes, not the category hierarchy. This keeps your tree clean, prevents “duplicate content” SEO issues, and ensures a faster mobile experience.
Use Canonical Tags to tell search engines which category is the “primary” home for the product. This prevents SEO penalties for duplicate content while allowing users to find a “Lighting” part under both “Off-Road Accessories” and “Electrical”.
Ready To Grow Your Business?
Ready to elevate your aftermarket eCommerce presence and conversions—across auto, truck, powersports, marine, and more? Connect with Web Shop Manager for tailored solutions: strategy, platform, and performance in one team.